Notice
Recent Posts
Recent Comments
Link
250x250
반응형
| 일 | 월 | 화 | 수 | 목 | 금 | 토 |
|---|---|---|---|---|---|---|
| 1 | 2 | 3 | 4 | 5 | ||
| 6 | 7 | 8 | 9 | 10 | 11 | 12 |
| 13 | 14 | 15 | 16 | 17 | 18 | 19 |
| 20 | 21 | 22 | 23 | 24 | 25 | 26 |
| 27 | 28 | 29 | 30 |
Tags
- docker
- 회고
- Remix
- Kaikas
- WSL
- Python
- 배포
- 블록체인
- React
- huggingface
- CSS
- jquery
- nft
- node
- AWS
- PM2
- Laravel
- 라라벨
- NextJS
- 티스토리챌린지
- threejs
- exceljs
- netfunnel
- Ai
- 오블완
- nginx
- metamask
- chatGPT
- miniconda
- polygon
Archives
- Today
- Total
박주니 개발 정리
1. threejs 이용해서 3d model 불러오고 움직이기 본문
728x90
반응형
※3d model 무료로 가져오기 꿀팁
Sketchfab - The best 3D viewer on the web
With a community of over one million creators, we are the world’s largest platform to publish, share, and discover 3D content on web, mobile, AR, and VR.
sketchfab.com
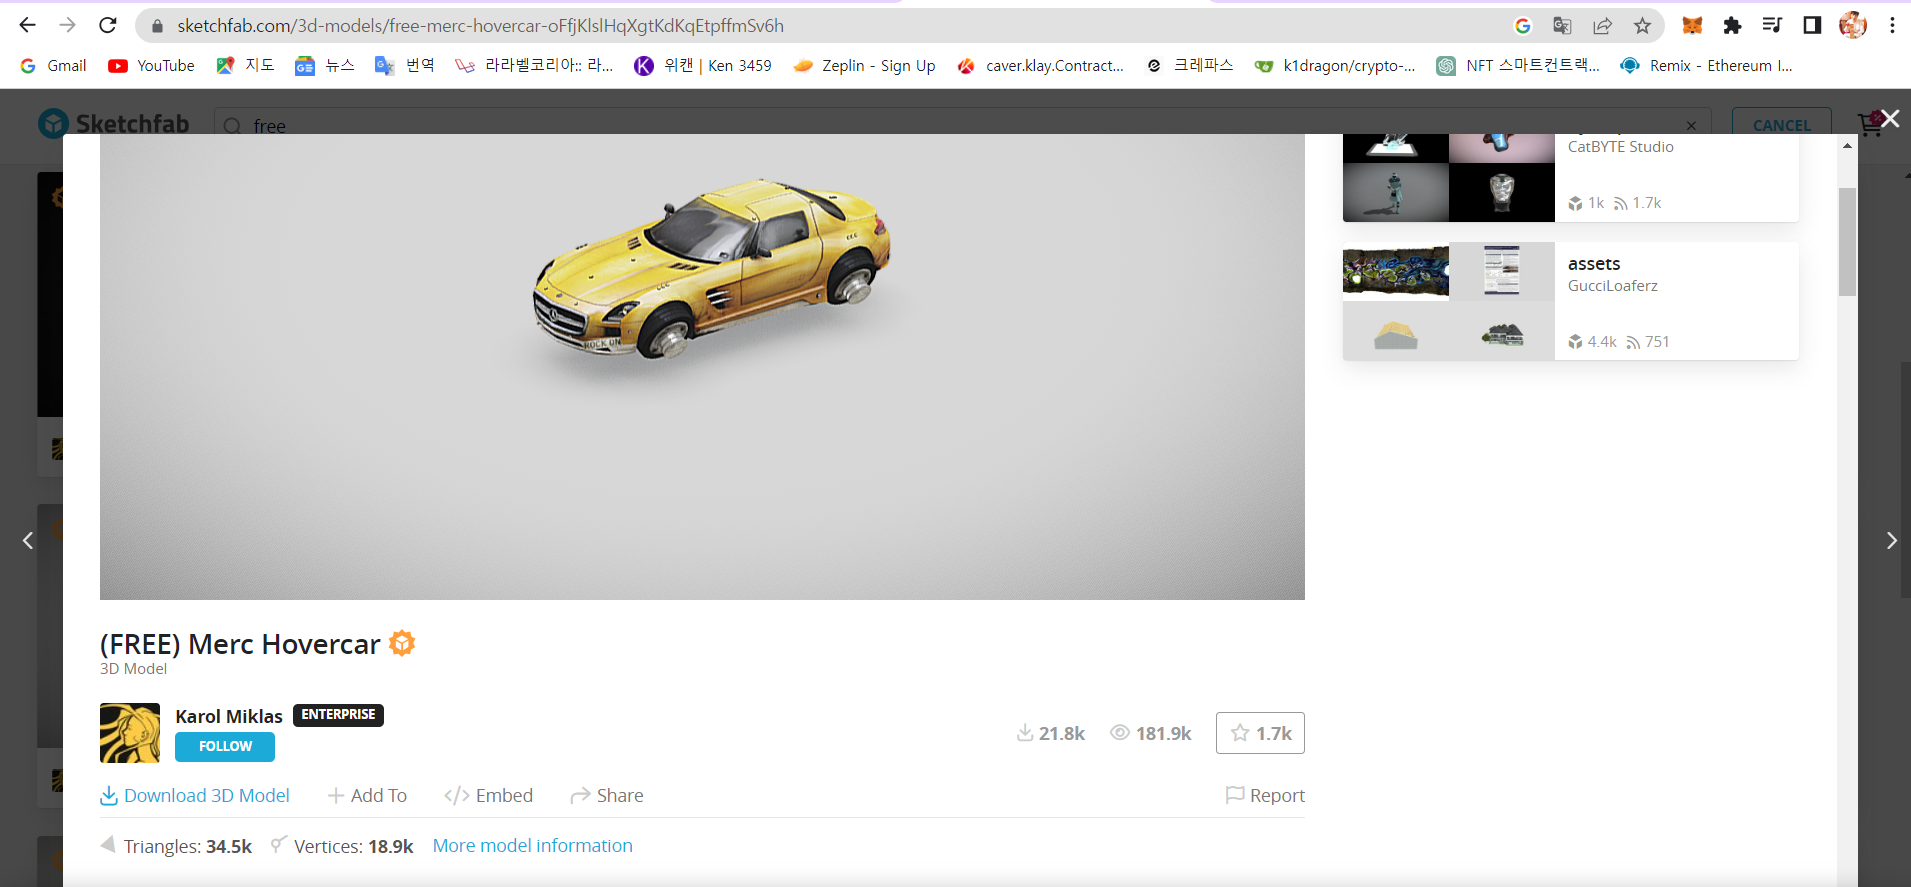
1. sketchfab 접속하셔서 회원가입하고 검색창에 free라고 입력합니다.
2. 원하시는 3d model을 선택하고 Download 3D Model을 클릭합니다.
3. 다운로드 type은 glTF로 받습니다.
※파일 셋팅
저는 우선 html에서 threejs를 script해서 간단하게 만들어봤습니다.

파일구조는 3d model download 받았던 파일을 넣을 폴더와 index.html을 구성하시면 됩니다.
- sketchfab에서 다운로드 받은 알집을 풀어서 전체 파일을 해당 폴더에다가 넣습니다. 저는 임의로 car라고 적었기 때문에 폴더 name은 직접 지정하시면 됩니다.
본론
전체코드 (index.html)
<!DOCTYPE html>
<html lang="en">
  <head>
    <meta charset="utf-8" />
    <title>React App</title>
  </head>
  <body>
    <canvas id="canvas" width="300" height="300"></canvas>
    <script type="importmap">
      {
        "imports": {
          "three": "https://unpkg.com/three@0.141.0/build/three.module.js",
          "GLTFLoader": "https://unpkg.com/three@0.141.0/examples/jsm/loaders/GLTFLoader.js",
          "OrbitControls": "https://unpkg.com/three@0.141.0/examples/jsm/controls/OrbitControls.js"
        }
      }
    </script>
    <script type="module">
        import { GLTFLoader } from 'GLTFLoader';
        import * as THREE from 'three';
        import { OrbitControls } from 'OrbitControls';

        let scene = new THREE.Scene();
        let renderer = new THREE.WebGLRenderer({
            canvas: document.querySelector('#canvas'),
            antialias : true
        });

        renderer.outputEncoding = THREE.sRGBEncoding;
        let camera = new THREE.PerspectiveCamera(30, 1);
        camera.position.set(0, 0, 15);  // 카메라 위치 설정

        // OrbitControls를 추가합니다.
        let controls = new OrbitControls(camera, renderer.domElement);
        controls.enableDamping = true; // 부드러운 회전을 위한 damping 활성화
        controls.dampingFactor = 0.25;

        let loader = new GLTFLoader();
        loader.load('car/scene.gltf', function (gltf) {
            scene.add(gltf.scene);
            scene.background = new THREE.Color('black');

            let ambientLight = new THREE.AmbientLight(0xffffff, 0.5);  // 색상과 강도
            scene.add(ambientLight);

            let dirLight = new THREE.DirectionalLight(0xffffff, 0.5);
            dirLight.position.set(0, 5, 5);  // 위치 설정
            scene.add(dirLight);

            function animate(){
                requestAnimationFrame(animate);
                controls.update(); // OrbitControls 업데이트를 추가합니다.
                renderer.render(scene, camera);
            }
            animate();
        });
    </script>
  </body>
</html>
먼저 전체 코드를 적용해보시고 loader.load에 3d model 파일 위치만 변경해서 사용해보시길 바랍니다.
추가 설명
- <canvas> : 이 부분은 build해서 화면에 보여질 때 현재 카메라에서 보여지는 부분을 말합니다. 즉 background size는 canvas에 설정한 width, height에 영향을 받습니다.
- 현재 script importmap에 설정된 것은 단순하게 말씀드리면 Threejs를 이용해서 3d model을 할 것이고 그중에서 type을 glTF를 할 것이기 때문에 GLTFLoader을 설정했고 마지막으로 마우스 움직여서 3d model을 움직일 수 있게 한것은 OrbitControls입니다.
그 이후에는 기본적으로 구성된 순서이기 때문에 코드 전체를 이해하기 보다는 어떤 부분을 수정하면 변하고 threejs는 1. 카메라 설정 2. 조명 설정 3. 배경 설정 부분이기 때문에 활용하는 방법을 이해하시는 게 좋을 것 같습니다.
'threejs' Related Articles
more

Comments